Plug in Models
The application uses the Django Administration feature to define models that are available to the application. This allows multiple models of different types to be configured, and injected or removed from the application at any time. There are three modes of operation of the application:
- Recommendations - standard recommendations, allowing different 2 models to be compared at once
- Personal Ranking - re-ranks popular films in a genre, with a single model on-screen at once
- Similar Items - shows items similar to others, with a single model on-screen at once. You can optionally send this list through a Personal Ranking model if you have one definedA
Each of these modes allows multiple models of their type to be used, but each mode can only show one or two different models simultaneously - however, you can choose any configured model at any time.
By default the admin user within Django does not exist - you need to create one. In your SSH session, ensure that the web server is running again, and then create a second SSH session. In that session, create the first superuser using the following commands. Please note down your username and password, as no-one will be able to retrieve it for you; in the Lab we suggest using admin and DoNotH@ckMe accordingly, but use any email address you like. You can then close the second SSH session
$ cd ~/personalize-video-recs/videorecs/ $ python manage.py createsuperuser Username (leave blank to use 'ec2-user'): admin Email address: anyone@email.com Password: Password (again): Superuser created successfully.- Login to the Django Administration site. This is at the same URL as the main application, but replace /recommend with /admin at the end of the URL. This will bring up the following screen, so login now with the credentials that you just created

This brings up the Site Administration screen, which show entries for Groups and Users (which we don’t need), but also a section called Recommend where you can add Personalize models to the app. Click on +Add link to begin to add a new model
Back on the AWS Console, go to the Amazon Personalize service console, select the summit-recs-dataset-group and then on the left-hand menu click Campaigns. This will show your summit-lab-recs-campaign, but if you created the two additional solutions earlier then at this point you could could first go into the Solutions and recipes menu item, click on each of these two additional solutions and create the associated campaigns quickly via the console (or feel free to skip this). Once you’re back on the Campaigns menu you should see this
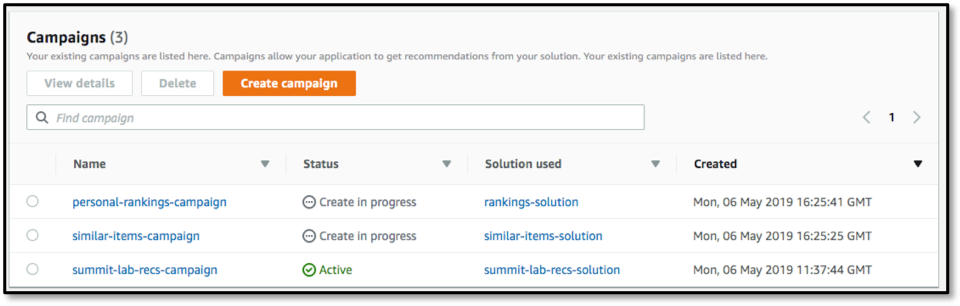
- Click on the summit-lab-recs-campaign and you’ll see the Campaign ARN - copy this, and head back to the admin screen. Enter Personal Recommendations for the model name, enter the ARN where it asks, ensure that the Model type is set for recommendations and set the Model sort order to 1. Click on SAVE to save the definition.

The application will use the sort order field to decide how to order models in the on-screen drop-downs. Only models of the right type are shown on the relevant screen, but there is no validation that you have entered the correct model type, and if you put a SIMS model on the Rankings screen then the application will throw errors.
If you also have a SIMS or Personal Ranking campaign then go ahead and add them now in the same way. You can then close the admin screen and head back to the main application web page
The main screen now shows the three models (or maybe just one) that we’ve built - it lists the precision metrics for each one, and as you add or remove models from the Django Administration page the changes will be reflected here. Now click on the Select Random User button

- The screen will look as before, but now if you click on the Model 1 drop-down you will see that our one Recommendation model is present - if you select it then the screen will refresh to show recommendations for this user using that model.

You can step through users to see how these look for different demographics of users. If you had multiple Recommendation models defined then they would also be in the two model drop-downs, and you’d be able to show two completely different recommendation models, based upon different user demographic or item metadata, allowing you to compare and contrast different approaches.
Try out the Personal Ranking personalize mode - this takes a list of the most popular movies in the dataset, either as a whole or in just a single genre. This will take that list and re-rank it into an order for this particular user, ensuring that the ones that are most likely to be interested in are shown first.
Finally, try the Similar Items personalize mode - this starts with the user’s top-ranked film, and finds a list of films that people who watched this also watched. This is done without reference to the user’s preferences, and the list is generated based upon what’s in the dataset as a whole. However, if you also have a Personal Ranking model defined then the Ordering drop-down will re-rank this list into one that is more suited to the user’s preferences.